Showing posts with label project. Show all posts

Friday, November 5, 2010

When I have a million hours of free time...

Whenever I get caught up on my current list of fun projects, I am going straight to this post for my next set. Here's what caught my eye this week:

Modern Family Tree


I am obsessed with genealogies and our family tree. I would love to sit down with the grandparents on both sides of the family, and pick their brains for all of the family history they can recall. In a totally non-Sylar-picking your brain kind of way. :-) I love how the tree became three dimensional with the addition of the frames over the vinyl tree. I especially love that Natalie made the vinyl decal herself! Awesomeness!

Canning Jar Soap Dispensers


I'm always a fan of repurposing something, and I also love using pretty glass to hold my liquids (like my makeup remover), so you can imagine how much I love these blue canning jar soap dispensers! They look easy enough too, and how cute would they be beside your bathroom or kitchen sink? Jan even has a few for sale in her Etsy shop, if you don't feel like making your own.

Upcycled Sweater


I shop for all my clothes almost exclusively at thrift stores now. I have so much fun, and I feel like my wardrobe is much more me and eclectic. Sometimes though, there's a certain new trend I like that hasn't made its way to the thrift stores. Sara shows you how to makeover a large men's sweater into a trendy sweater dress! And it's only a couple of seams for all you sewing-phobes. :-)

And now for the grand finale of my finds this week - a faux capiz chandelier!

DIY Capiz Chandelier


Erin spent a little bit of money, and a lot of bit of time :-) to make this super convincing knockoff capiz chandelier. I'm thinking that it would be super easy to adapt this idea for any size light that you might want in your home, and I am specifically considering this for my far-off-in-the-future office.  The "shells" are made out of wax paper - how cool is that?

So that rounds up this week's inspiring projects. And someday when I think "gee, I have nothing to do today!" I will know right where to go for more ideas! :-) Yeah, right, like that day will ever come....

Tuesday, April 27, 2010

Inspiration Tuesday: Jewelry and Hair Flowers

In an effort to corral my every increasing project list, (as well as clear all the files off of my hard drive), Inspiration Tuesday will be occupied for the next few weeks with projects that I would love to try out some day. So I apologize for the redundancy for some of you, but maybe someone will get inspired!  I've included links when I have them.


Black and Gold Earrings. Love the little gold dangles, and the contrast between the black and the gold.


Clip On Earring Necklace.  I'll be watching for a beautiful pair of clip-ons to make this little pretty.


No links for these, but I'd love to make something inspired from them.


Hair Flowers:


Feather Light Hair Flowers. Love the textures in this hair flower, although I think I would tone down the frou frou.


Make your own silk flower. Love the little jewels inside this hair flower.

Wednesday, July 8, 2009

Tutorial by Request


CheL asked about my method for displaying and storing my earrings. You can see the frame we made in this post about my glitzy glasses, it is the last picture. Lover and I made this little frame back when we were dating. I think it took us about an hour or two to complete. It's very simple, and it is such a great way to show off all of your lovely jewels.
This is by no means my own original idea, I initially got the idea from a jewelry stand at a craft show, and have seen many variations of this since.

I have seen a lot of variations that start with using a wooden picture frame in the size that you would like. We just bought moulding and mitered the corners and then nailed them together to form the frame. We only had a miter box at the time, so the cuts are not the greatest. Then we took a piece of window screen, cut to size and stapled that onto the back of the frame. We nailed some thin strips of wood over the screen on the back to stabilize the screen and push the frame away from the wall a bit, so that the earring hooks wouldn't run into the wall. The next step was to sponge gold paint onto the frame, and a little onto the screen for some sparkle. We sponged a little black paint over the gold to add depth and drama. Voila! In an afternoon I had a stylish way of displaying my many earrings.


Note: These are only a fraction of the earrings I own. I am in the process of switching all of my hooks over to sterling silver and 14K gold as my ears are...picky about the jewels I hang from them.


For a great tutorial on how to make your own, check out this link for instructables.com You can also add little hooks screwed into the frame to display your necklaces, if you do not have a lovely set of glasses like I do. ;-)

Wednesday, June 17, 2009

Lions and Tigers and Bears, Oh My!


Part of throwing a great party is having the perfect present, and I am so proud of the one I made for my lovely sister-in-law. But first the back story:

The week after Sara's shower I, along with my sisters-in-law, threw a combination baby shower/going away party for my brother and sister-in-law. They're moving across the country and having a baby shortly thereafter, so we wanted to send them off in style. I'll post more details about that party in the next few days, but first I wanted to share the oh-so-awesome present that I dreamt up for them.

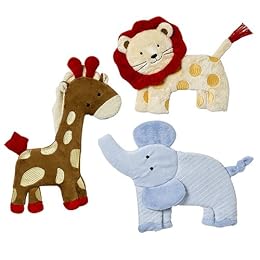
Months ago, when my sister-in-law registered at Target, I fell in love with the theme she had picked out for the nursery.

These adorable little animals will be on the crib blanket, the rug and everywhere else. They're a really simple drawing, so I knew that doing watercolors of them would be a piece of cake.

I bought three 8x10 frames, and did a watercolor of the elephant, the tiger and the giraffe.


I love how they turned out, my favorite is definitely the giraffe! Aren't they so cute and cuddly? I am sure my little nephew will be bribed into choosing me as favorite aunt love them as much as I do!

Monday, June 1, 2009

Progress, Water and Dishes


I posted a few months ago (here) about three things that I am trying to improve.  Drinking more water, reducing the paper clutter I have everywhere, and keeping up with the dishes.  I thought long and hard about how to resolve these little challenges in my life and here is what I came up with;
  • Drinking more water. I realized that I don't like carrying a glass around the house with me, because I am afraid I will break it. So, I went to Target and found a couple of pretty little acrylic glasses for $0.74ea. Breakage fear solved, and water intake increased. :-) 
  • Keeping up with the dishes. It seemed inefficient to me to always be washing dishes, so I would wait until there was a mountain in the sink. The mountain was then so overwhelming that I couldn't bring myself to even start working on them.... yep, quite the vicious cycle. So, now I try to do dishes a couple times a day, and I have to say I have pretty much kept them at bay. My kitchen, husband and guests all thank me. :-) 
  • Reducing paper clutter. I'm saving this one for a separate post as I have come up with a few different ways to corral my clutter, and they are pretty good, if I do say so myself. :-) 

Monday, February 23, 2009

Three Things to Work On

Although I do try to keep this blog restricted to house content, there are three things I am trying to improve in my day to day life and my housekeeping skills. I thought I would blog about them in an effort to keep me accountable. :-) I'll letcha know how it goes. 
  1.  First of all, I am trying to work on the clutter that accumulates on all surfaces/tabletops on the first floor.  
  2. Second of all, I really have to keep the dishes at bay. We don't have a dishwasher, but as there are only two of us, I really have no excuse.

     
  3. Third, I need to drink more water. I was good about this when I was working, but not so much at home. 


Soon to come, the ways I am going to solve these problems!! Stay tuned!

Monday, November 3, 2008

SO nice to finish a project!


Problem:
The old stairs leading to the deck and the back entrance left a little to be desired. A little too narrow, a little too high, a little too blech. Our dog had a lot of trouble climbing the stairs whenever her arthritis was acting up, and let's just say that climbing those stairs with your hands full of groceries wasn't the easiest task in the world.

Solution:

Have handy dandy husband build lovely new stairs! See?


Aren't they lovely? They only took about two hours to make!

Here's a closeup...


And the best part is, they're all finished. We haven't been able to say that about a project for... oh about eight months now. :-)