Friday, October 30, 2009

Friday Favs: Fall Foliage

About a week ago, Lover had a little bit of vacation time, so we took a few day trips to admire the fall foliage in our area. Unfortunately the sun was apparently also on vacation, so I was only able to get a few good shots. We had a lovely time, driving around, having some great conversation and drinking in all of the beautiful scenery. If you are ever in the Finger Lakes region of New York, count yourself lucky. It is truly a beautiful place.

I loved these funky red cones, and the way the contrasted with the corn rows behind them.

In front of the red cones there was some cool dried grasses and seed pods.

The sun briefly graced us with her presence, and I love the silhouetted farm buildings.

My favorite shots of the day were at this farm from the side of the road.

The light was absolute perfection, and I love how the trees, fence posts and corn fields were lit up by the radiant sunlight.


Hope you like the shots as much as I did!

Wednesday, October 28, 2009

Decorating for Fall


Typically I go all out decorating for fall. I have an entire Rubbermaid bin devoted to my fall decorations. But this year I went for simple touches of fall in bits and pieces throughout the main rooms. We'e worked really hard on our house this summer, and accomplished a lot of projects, and I've been enjoying how the rooms have really come together. I didn't feel like covering all of our hard work up with a bunch of garlands and decorations.

In the living room, I moved some of the mantel decorations around, just a little bit. I absolutely love this painting on the middle of the mantel. I moved my clear vase of sticks and pinecones next to it, and added a little gold vase filled with fall leaves and an Indian corn. Aren't you loving my luscious jade plant that I picked up recently? I love it!


I really enjoy decorating just the corners of the mantel, leaving the rest clean and bare. I think it draws more attention to the beautiful woodwork. On the left is my pretty leaf pillar holder, with the Moroccan lantern and my amber thrift stores goblets. Under the goblets is a collection of Jane Austen's novels.

On the right is a picture of a castle in Avila, Spain with another beautiful gold vase. The books underneath the pumpkin are The Lord God Made Them All by James Herriott, and The Alhambra by Washington Irving. Both are great books. I found the pumpkin last fall at the Christmas Tree Shop.

On the piano I swapped out the summery stuff I had there and replaced it with one of my favorite picture frames of the two of us. The frame was a wedding gift, and I love the collection of pictures in it. An urn with some fall berries completed this uber simple setup.

By the window I hung my gorgeous fall wreath. I love all of the colors and elements of this wreath. It just exudes fall, in my opinion. This is the perfect spot for the wreath, as I am still searching for the perfect something to go on the wall here between the doorway and the window.


Moving on to the dining room, I did something I don't usually do, I set the table for a lovely autumn dinner. I think dining rooms look so much nicer when they are all set for dinner, don't you think?
The champagne glasses I found at the dollar store, can you believe that? The glass is such a pretty shade of green.

I made the centerpiece, although it didn't come out like I originally planned. I found the tray at Goodwill, leftover from Target's clearance. Of course it wasn't that pretty, being a neon green. Some spray paint fixed that problem. I wanted to make tea light holders out of mini pumpkins, but I couldn't find them anywhere this fall. Not sure what was up with that. So, instead I used a bunch of little candles that I already had. The filler is a bag of split peas! :-)

Don't you just love my plates? They are Spanish china, that my parents bought for me when I lived in Spain. I love that they remind me of Spain, and also of the Currier & Ives plates that we had growing up. These are just the salad plates, but I have most of the set. :-) The colors in the plates inspired the color scheme for the living room and dining room.

Then there are just a few other touches in the dining room. A little pumpkin and some baubles on the antique dresser,


some garlands all piled up in the wooden bowl on the bookcase,

and some deep red hydrangeas and pinecones on my refinished dresser. Isn't my red rose from Lover beautiful!

Hope you enjoyed my little fall tour. I'm linking this up to Tablescape Thursday, my very first tablescape! :-)

Paper Organization: How to organize your office

I can be a bit of a packrat at times. I used to be a terrible one, with multiple collections, mountains of school papers, old and new artwork, etc. So I guess it would be fair to say that I am a recovering packrat. Watching my grandparents get older and not be able to move because of the amount of stuff they have has really been a wakeup call for me. And of course, now we own our own home and I refuse to fill it the rafters with pointless junk. And overall I'd say I'm doing a pretty good job of getting rid of junk. Paperwork, however, is the bane of my existence. That's all changed though, thanks to 8+ hours spent during my fall cleaning in the office, organizing, throwing away, shredding and ruthless editing. Here's the proof that I was ruthless.


So here is the system I developed for managing the various types of paper that take up residence in our home.

Receipts: We have a beautiful antique dresser in our dining room with two small top drawers. The one of the right is the perfect size to hold receipts until I've had time to go through them. The ones I ultimately keep are guarantees from garden centers, as well as most of our Lowe's/Home Depot receipts because of our many house projects. I also need to keep receipts for my business, so they'll end up in a file folder up in the office once sorted through.

Coupons: I always have a bunch of coupons for craft stores, home improvement stores, Bed Bath and Beyond and others laying around. Placing them in the left drawer of the dresser means that I no longer have to constantly search for that $1.00 off Pantene hair products coupon.

Upstairs in the office, paperwork is contained in a few different places:


Paystub Box: I use a decorative photo box to toss all of the paystubs in every two weeks. Once we get our w-2's at the end of the year I'll shred the paystubs from 2009.


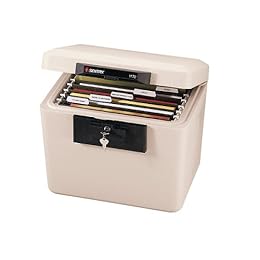
Fireproof Safe:

This small safe is the perfect size for the paperwork we'll need if there is a problem. It holds the following categories:


  • Important papers like passports, marriage license, car titles and registration, copies of SS cards, college transcripts, birth certificates

  • Auto insurance policy

  • Homeowners insurance policy, receipts, mortgage info and other important house documents

  • Jewelry insurance policy

  • Life insurance policy

  • Investment information I keep the most recent statements from retirement accounts and investments

  • Taxes At the beginning on the year I begin a folder marked TAXES _year_ . I add to this throughout the year, with tax deductible info, tax receipts, and other information we'll need at tax time. It makes tax paperwork a breeze. The folders for previous years hold copies of our tax returns and W-2s.

  • Loan information for school loan (only two years left!)


The safe also holds a digital copy of our wedding pictures, just in case!


File cabinet:

The file drawer holds what I call "burnable" paperwork. :-) These are the categories I use:


  • Important receipts like vehicle registration payment, items with warranties (Lowe's) etc. marked Receipts _year_

  • Medical Records: keeps relevant data like immunizations, hospital visits, etc.

  • Manuals and Warranties: I go through this folder every so often to edit out old items we no longer have.

  • Credit Cards: Just the most recent statement. When I receive a new statement, I replace the old one, and then shred it. (Disclaimer: this is what works for us. We carry no debt on our cards, so we aren't keeping track of anything with our statements. We only keep the most recent statement, as the balance is paid in full each month.)

  • Utilities: Again, we replace the old statement with the new one when we receive them. Most of your utilities are public record anyway, so there's no need for YOU to keep them! Our one exception is our gas and electric bills because we have had a lot of trouble dealing with them, so we'd rather keep them all.

  • Car repairs: We have old cars so we don't keep much information on this, but we do keep things that show lifetime warranties, etc. For a new car, it might be worth keeping a record of work done on the car.


Expandable File Folder: I use this specifically for house paperwork. We are constantly working on floorplans, getting estimates, picking up samples of flooring and grabbing paint chips. This little file folder holds everything in one place and makes it easy for me to find whatever I need.


The thing to remember when you're trying to control your paperwork is that you have to make your system work for you. I used to have a super detailed, uber organized filing system, but I never used it, so it was pointless. You may have different categories, or you may not have time to file every week. If that's the case, get some sort of a basket or folder that can hold your items "to be filed" until you get a chance. If the basket gets full, you'll know it's time to file!

I hope this helps you get organized! I know it has really given me peace of mind to feel like I finally have things under control in this area. :-)


Tuesday, October 27, 2009

The View from My Window

All last week as I sat on the couch reading, blogging, watching shows or folding laundry, I enjoyed this beautiful view out my living room window. The colors on this tree just got more and more intense as each day went by.

I love fall, with its explosion of colors, the smells in the air and the crunch of leaves underfoot. After a few really chilly weeks we've enjoyed really mild temperatures and lots of sunshine, which means fall has been awesome so far. Fall is really special to me because Lover proposed in October four years ago. It's my favorite time of year and while I didn't want to risk a wedding in the unpredictable fall weather, I am so glad that he proposed during fall.

Lover and I were talking the other day about how creative God is. Only God would make something become increasingly more beautiful as it died. I love that he chose to inject so much beauty into the everyday things that surround us. I often wonder what the mind of God is like that he gave us so much beauty. Why not make every snowflake the same? Why create a rainbow with sunshine and rain? Why create a flower in every color under the sun, and then some?

The only conclusion I can come up with is this.

Because He is God, and He can.

Saturday, October 24, 2009

Mirror Makeover using thrifty materials and some ingenuity!


Sometimes you just can't find that perfect item in a store, and it is up to you to make your vision come true! I had been searching and searching for just the right mirror to hang above our newly refinished dresser in the dining room. This area is right by the front door, so it is the perfect place for that last quick check before you run out of the house. Unfortunately I couldn't find anything that I really liked for this spot, not even something that was out of my price range. I finally decided I would have to rise to the occasion and make them myself.

I picked up two rectangular mirrors (about the size of a piece of computer paper) at the dollar store, along with some puffy scrapbook stickers. I wasn't sure exactly what I would do with them, so I took them home and decided to mull it over for a while. I considered feathers, leaves, shell pieces, and yarn. None of that seemed right. So, I let them sit for a week or so, and eventually I knew what I wanted to do with them.

I had a midnight blue craft paint that would work as the base coat, and a metallic craft paint that I could use to give the mirror edges some extra sparkle. The puffy stickers would add a little bit of detail and interest, and hung together the mirrors would look like they were meant to be a set.


Here's the step by step process that I used.

These are the dollar store mirrors, the border around the mirrors is some kind of matte paper-like stuff.


I taped off the area of the mirror closest to the border with masking tape, and gave them both a coat of the midnight blue paint. Craft paint dries really fast, so I was able to go do the dishes, and then come back for the next coat.


I took a paintbrush and dipped just a little part of it into the metallic paint. Then, I brushed it over the newspaper till it was all mostly gone, and then brushed it over the blue paint in a haphazard irregular pattern.


While that dried I painted the stickers in the same blue paint, then highlighted the details with the metallic paint.


Once all the paint had dried and the mirrors were de-masking taped, I placed a little sticker in the lower corners of the mirrors. Here is where I got a lucky break. I felt like they weren't quite right, with the stickers all at the bottom of the mirrors. Then I realized that one of the mirrors was upside down, and in order to hang them correctly, the stickers would be in the top corners! And it just looked so much better that way.


Hanging them on the wall was a cinch, and I love how they look above the dresser and the little fall decorations beneath them. I love that they were so cheap and yet they are exactly what I wanted!


Linked to Metamorphosis Monday, check out all the other projects!

DIY Day @ A Soft Place to Land

Mirror Makeover using thrifty materials and some ingenuity!


Sometimes you just can't find that perfect item in a store, and it is up to you to make your vision come true! I had been searching and searching for just the right mirror to hang above our newly refinished dresser in the dining room. This area is right by the front door, so it is the perfect place for that last quick check before you run out of the house. Unfortunately I couldn't find anything that I really liked for this spot, not even something that was out of my price range. I finally decided I would have to rise to the occasion and make them myself.

I picked up two rectangular mirrors (about the size of a piece of computer paper) at the dollar store, along with some puffy scrapbook stickers. I wasn't sure exactly what I would do with them, so I took them home and decided to mull it over for a while. I considered feathers, leaves, shell pieces, and yarn. None of that seemed right. So, I let them sit for a week or so, and eventually I knew what I wanted to do with them.

I had a midnight blue craft paint that would work as the base coat, and a metallic craft paint that I could use to give the mirror edges some extra sparkle. The puffy stickers would add a little bit of detail and interest, and hung together the mirrors would look like they were meant to be a set.


Here's the step by step process that I used.

These are the dollar store mirrors, the border around the mirrors is some kind of matte paper-like stuff.

I taped off the area of the mirror closest to the border with masking tape, and gave them both a coat of the midnight blue paint. Craft paint dries really fast, so I was able to go do the dishes, and then come back for the next coat.

I took a paintbrush and dipped just a little part of it into the metallic paint. Then, I brushed it over the newspaper till it was all mostly gone, and then brushed it over the blue paint in a haphazard irregular pattern.

While that dried I painted the stickers in the same blue paint, then highlighted the details with the metallic paint.


Once all the paint had dried and the mirrors were de-masking taped, I placed a little sticker in the lower corners of the mirrors. Here is where I got a lucky break. I felt like they weren't quite right, with the stickers all at the bottom of the mirrors. Then I realized that one of the mirrors was upside down, and in order to hang them correctly, the stickers would be in the top corners! And it just looked so much better that way.

Hanging them on the wall was a cinch, and I love how they look above the dresser and the little fall decorations beneath them. I love that they were so cheap and yet they are exactly what I wanted!


Linked to Metamorphosis Monday, check out all the other projects!

Thursday, October 22, 2009

Ultimate Chocolate Cake


A few weeks ago my soon to be sister-in-law and I got together for some "girl time." She brought this awesome chocolate cake and some chocolate covered strawberries. Let me tell you, this stuff is AWESOME. Our local grocery chain, Wegmans, held a contest a while back to find the ultimate chocolate cake recipe. They came up with a moist, rich chocolate cake with a creamy frosting, that is the ultimate fix for when you really want some decadent chocolate. I'm not usually much for chocolate flavored things (I prefer just straight chocolate), but this one really takes the cake. (Takes the cake, get it?) Unfortunately, they don't share their super secret recipe, so I did some hunting of my own, and found you this Too Much Chocolate Cake (is there any such thing?) recipe that gets rave reviews on allrecipes.com and won first prize at the creator's county fair. So, because I am in a sharing mood, you can get in on the fun!

Too Much Chocolate Cake

INGREDIENTS:

  • 1 (18.25 ounce) package devil's food cake mix
  • 1 (5.9 ounce) package instant chocolate pudding mix
  • 1 cup sour cream
  • 1 cup vegetable oil
  • 4 eggs
  • 1/2 cup warm water
  • 2 cups semisweet chocolate chips

DIRECTIONS:

  1. Preheat oven to 350 degrees F (175 degrees C).
  2. In a large bowl, mix together the cake and pudding mixes, sour cream, oil, beaten eggs and water. Stir in the chocolate chips and pour batter into a well greased 12 cup bundt pan.
  3. Bake for 50 to 55 minutes, or until top is springy to the touch and a wooden toothpick inserted comes out clean. Cool cake thoroughly in pan at least an hour and a half before inverting onto a plate If desired, dust the cake with powdered sugar.
Original recipe here. Also, if you'd rather make your frosting from scratch, you can use this recipe. :-) You're welcome!