We checked in on Sunday to our hotel in Manhattan, and shortly after that discovered that the view from our window looked like this:
Yup, that is the Empire State Building. We're on the 25th floor, so we have a great view. We also need a key card to access our floor. How fun is that? :-)
Of course, this is what the Building looks like right now, with the mega snowstorm. Let me just say, that storm is seriously cramping my shopping plans. :-)
What do you love about NYC?
Friday, February 26, 2010
Wednesday, February 24, 2010
Basement Overhaul: The Befores
As we are making good progress on the basement, and things are starting to resemble real rooms and areas again, I thought you might like to see what the basement looked like when we bought the house. Prepare yourself, as these pictures are sure to produce a strong reaction. Not an "aw!" reaction, more like a "yikes!" reaction. :-)
Are you ready? Ok, here we go. Here are the stairs that lead down to the basement. Fancy schmancy, eh? We kept those "BAR" letters, because they were just too darn tacky to throw away. Watch for them in the final reveal, we'll find a new home for them. :-)
Here's a picture looking up the stairs, so you can see where everything is in the basement.
Ok, when you reach the bottom of the stairs, on your left is the kitchen. Here's that enormous freezer I've talked about in the past.
Through the kitchen is the storage room, which came complete with green shag carpeting and three thousand two-prong extension cords (i.e. pretty useless cords)
Now, come back out of the storage room and go back to the stairs. On the left hand side is the "bar" area. Apparently they were going for a "watering hole" style of decor with the wooden corral bars and the overabundance of wood. And yes, those stools came with the house. I think they're in the attic right now. Isn't that shag on the walls and ceiling AWESOME!
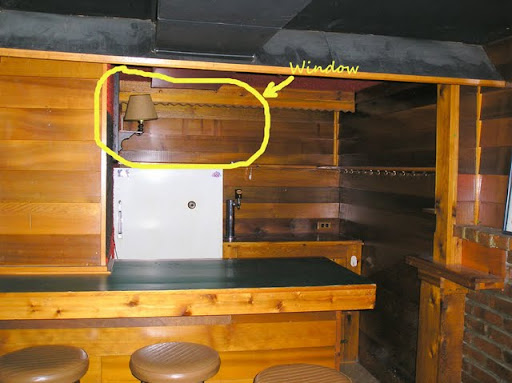
The wooden bar was covered with green contact paper. Don't ask why, as I really don't know. See that black slanted "roof" on top of the bar? When we first toured the house there was a collection of baseball caps up there. Thankfully, they were gone when we bought the house. You can just barely make out the orange and brown shag carpet ont the wall where the lamp is, and on the ceiling.
Here's a better picture of that whole corner, where you can see the bar, the keg fridge that came with the house, the random brick wall and the lovely lighthouse poster that was left for us.
On the right of the brick wall (which is only about six feet long) was this builtin bookshelf extravaganza, covering the gas meter and the water main. The backs of the bookshelves are padded with red shag. The black panels "hide" the gas meter. They actually had really interesting handles on them, but the previous owners took them off before we bought the house. (!?!)
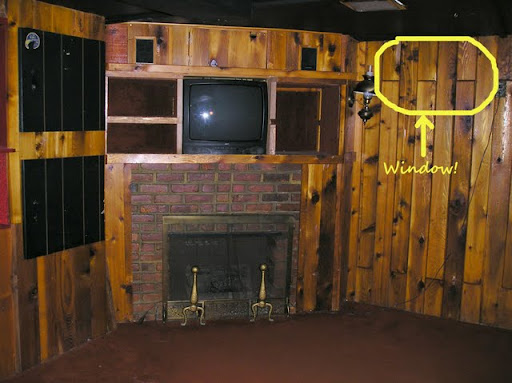
Just past the bookshelves is the TV corner. We're now on the right side of the basement. This whole entertainment center was built in to the wall, and that fireplace?? It's not real. They built an entire corner fireplace, with real brick and mortar, and then put an electric "fire" inside. Sigh. That thing was a bear to remove.
Moving on. In the opposite corner there was a lovely wall of mirrors. See that lovely pendant light? (gag!) Here's another one of the wall decorations we inherited, that covered up a missing mirror tile. I'm not sure why they covered it instead of replacing it, we found an entire box of leftover mirror tiles in the garage. Oh well.
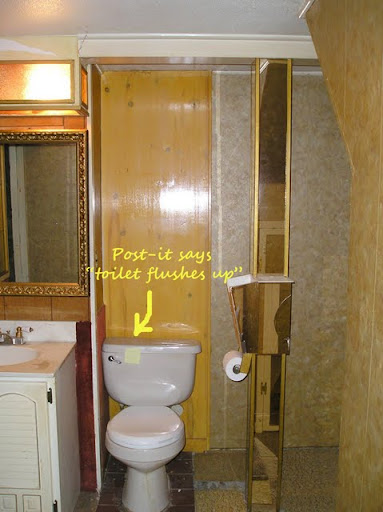
Ok, all that's left to see is the bathroom. The toilet is straight on when you walk in, elevated on lovely brick red tiles. Why, I am not sure.
To the right is a built in closet, with mirrors, and a support post that has been mirrored as well. The mirrors help the space "feel bigger." Don't you think?
To the left is the vanity, with a gold mirror and another wall of mirrors. The gold mirror was covering up a huge hole in the wall that allowed "access" to the water shutoff valves for the basement.
And lastly, the laundry room. Go through the carpeted doors, (ew!)
and you are greeted with this. Paneling in front of you,
fish wallpaper on the left
and this psychedelic cabinet on the right. Lovely, no?
We won't talk about how the wallpaper is covering what used to be a doorway, before they stuffed drywall in it and paneled the other side. We also won't talk about the backwards-in the corner laundry sink, or the fact that it is directly under the electrical panel. Because, really, isn't that the way YOU would set this room up?
So that's the basement's befores. Oh, and if you're wondering about where the covered up windows were, they were here,
and here.
This one is the one we had replaced with the glass block window. The other one already was glass block, they had just paneled right over it.
I do have this to say, in the previous owners' defense. If they hadn't created such a garish basement, our before and afters wouldn't be nearly as impressive. :-) I mean, anything is going to be better than this, right?
Tuesday, February 23, 2010
Inspiration Tuesday: Candice Olson Basements
Are you tired of hearing about our basement yet? I'm sorry. We're tired of working on it too. :-) This week we're taking a well deserved rest from the renovations and spending some serious time together, relaxing and reconnecting. In the mean time, here are some great basement designs from Candice Olson.
Sunday, February 21, 2010
Living Room Lamp Makeover
After a few months of searching, and a few more months of trial and error, I have a pair of lamps that I am absolutely crazy about. They're sitting pretty on either side of the couch in my living room - and they are definitely an upgrade from the previous lamps.
Here's the Before:
And the After:
But it wasn't as simple as just swapping out one lamp for another. Oh how I wish it had been! I love doing things myself and adding my own personal touch to things, but sometimes I get myself in over my head.
We bought the little iron lamps from Walmart when we first got married. They were $13 a set, and our living room had no lamps, and we were broke, so that is what we got. I really liked the iron scrollys, and really didn't like the shades. (Faux leather anyone?) They were fine in our little apartment, where everything was perfectly mismatched, but once we moved into the castle, I was ready for something new. I took my time though, waiting to find a pair of lamps that I really liked, within my price range.
Last November I found a pair of lamps at the bargain outlet for $20. I loved the shape of them, and the price. I wasn't sure about the finish on them, but I knew I could change it if I wanted. Then, in December, right before Christmas, I found a set of matching, almost drum shaped shades at the Salvation Army store. Only problem? They were fire engine red! Nice, but they wouldn't exactly go with my decor. :-) But I figured for 6.99 a piece I could recover them and still come out ahead. (Famous last words.)
The first thing I did was strip them down to the metal frame.
I took careful notes on how the shade and lining had been constructed, as well as the little details like the border binding and the little bits of fabric that covered the poles. Then I went to JoAnns' and asked them to help me find the closest match to the fabric that was already on the shade, which seemed to be some sort of taffeta. The closest they had was an ivory taffeta that wasn't exactly the same weight, but I figured it would work. I made all the necessary measurements, and then spent a day making the first shade. I sewed and glued and cut and glued and burned my finger.
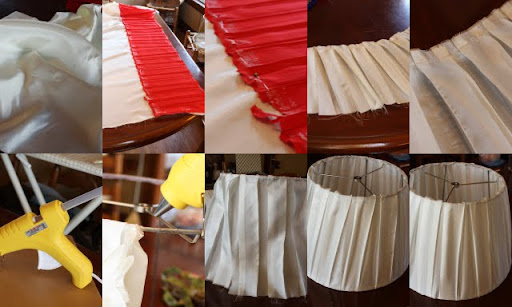
And it looked horrible. Actually, it looked ok, until you turned the light on. Then you could see all the places I had messed up, and the taffeta wasn't a thick enough weight, so there were shadows in all the wrong places (where I had messed up). Plus, in an attempt to be thrifty, I had reused the lining from the original shade, and it looked terrible. For one thing, there was a big tear in one side!
I lived with it for a few days to see if I was just being too much of a perfectionist. Well, apparently I am too much of a perfectionist, because I hated it. So, I was back to square one. I spent some more time thinking about it, and working up the nerve to try again. Then I went back to JoAnns in search of something that would work better for these particular shades. This time I selected a linen fabric that was a creamy oatmeal color, that I instantly loved. And I spent $18 on it, which brought my total for each shade to over $20. Oh well. I was all in at this point. I also purchased a hem gauge, to aid me in creating an even binding for the edge of the shade.
This time each shade took me only two hours to complete, start to finish. I simply traced the frame onto the fabric, allowing for some extra to wrap around as a hem. I used the leftover taffeta from the first purchase as a lining, and skipped the pleats all together. The fabric has so much texture that it didn't need a complicated pattern. A simple border at the top and bottom covered the uglies of the shade, and looked fabulous. I didn't burn myself. I loved the fabric. The world was back as it should be. :-)
I also ended up painting the lamp bases. They were a shiny gold color, with some black in them. I painted the bases with a metallic craft paint called Rich Espresso. Which actually looks like a really deep bronze. Then I took a matte black spray paint and sprayed it very very lightly over the bronze, to darken the color up just a bit more. They came out perfect. The original finish is on the left, my madeover version is on the right. (Pre black spray paint)
And the funny thing was, once I finished everything an put them all together, along with the finials I had purchased at the same time as the shades, the new color matched the finish on the finials perfectly. I'm guessing there was some subconscious thought processes goin on there.
So, in the end, my total came to about $30 per lamp, after the initial purchase of the lamp and shades, the first fabric purchase, the second purchase, and the miscellaneous supplies. I 'm not sure I would have snatched a pair of lamps off the shelf for that price, but the end result is something I absolutely LOVE, I made entirely by myself, and they are so classic looking that I won't tire of them easily. So if I had known all of that in the store, I probably would have paid that.
Here's the Before:
And the After:
But it wasn't as simple as just swapping out one lamp for another. Oh how I wish it had been! I love doing things myself and adding my own personal touch to things, but sometimes I get myself in over my head.
We bought the little iron lamps from Walmart when we first got married. They were $13 a set, and our living room had no lamps, and we were broke, so that is what we got. I really liked the iron scrollys, and really didn't like the shades. (Faux leather anyone?) They were fine in our little apartment, where everything was perfectly mismatched, but once we moved into the castle, I was ready for something new. I took my time though, waiting to find a pair of lamps that I really liked, within my price range.
Last November I found a pair of lamps at the bargain outlet for $20. I loved the shape of them, and the price. I wasn't sure about the finish on them, but I knew I could change it if I wanted. Then, in December, right before Christmas, I found a set of matching, almost drum shaped shades at the Salvation Army store. Only problem? They were fire engine red! Nice, but they wouldn't exactly go with my decor. :-) But I figured for 6.99 a piece I could recover them and still come out ahead. (Famous last words.)
The first thing I did was strip them down to the metal frame.
I took careful notes on how the shade and lining had been constructed, as well as the little details like the border binding and the little bits of fabric that covered the poles. Then I went to JoAnns' and asked them to help me find the closest match to the fabric that was already on the shade, which seemed to be some sort of taffeta. The closest they had was an ivory taffeta that wasn't exactly the same weight, but I figured it would work. I made all the necessary measurements, and then spent a day making the first shade. I sewed and glued and cut and glued and burned my finger.
And it looked horrible. Actually, it looked ok, until you turned the light on. Then you could see all the places I had messed up, and the taffeta wasn't a thick enough weight, so there were shadows in all the wrong places (where I had messed up). Plus, in an attempt to be thrifty, I had reused the lining from the original shade, and it looked terrible. For one thing, there was a big tear in one side!
I lived with it for a few days to see if I was just being too much of a perfectionist. Well, apparently I am too much of a perfectionist, because I hated it. So, I was back to square one. I spent some more time thinking about it, and working up the nerve to try again. Then I went back to JoAnns in search of something that would work better for these particular shades. This time I selected a linen fabric that was a creamy oatmeal color, that I instantly loved. And I spent $18 on it, which brought my total for each shade to over $20. Oh well. I was all in at this point. I also purchased a hem gauge, to aid me in creating an even binding for the edge of the shade.
This time each shade took me only two hours to complete, start to finish. I simply traced the frame onto the fabric, allowing for some extra to wrap around as a hem. I used the leftover taffeta from the first purchase as a lining, and skipped the pleats all together. The fabric has so much texture that it didn't need a complicated pattern. A simple border at the top and bottom covered the uglies of the shade, and looked fabulous. I didn't burn myself. I loved the fabric. The world was back as it should be. :-)
I also ended up painting the lamp bases. They were a shiny gold color, with some black in them. I painted the bases with a metallic craft paint called Rich Espresso. Which actually looks like a really deep bronze. Then I took a matte black spray paint and sprayed it very very lightly over the bronze, to darken the color up just a bit more. They came out perfect. The original finish is on the left, my madeover version is on the right. (Pre black spray paint)
And the funny thing was, once I finished everything an put them all together, along with the finials I had purchased at the same time as the shades, the new color matched the finish on the finials perfectly. I'm guessing there was some subconscious thought processes goin on there.
So, in the end, my total came to about $30 per lamp, after the initial purchase of the lamp and shades, the first fabric purchase, the second purchase, and the miscellaneous supplies. I 'm not sure I would have snatched a pair of lamps off the shelf for that price, but the end result is something I absolutely LOVE, I made entirely by myself, and they are so classic looking that I won't tire of them easily. So if I had known all of that in the store, I probably would have paid that.
What do YOU think? Was it worth all of the hard work and heartache?
Linked to Metamorphosis Monday @ Between Naps on The Porch
Make Your Monday @ Twice Remembered
Make it for Monday @ Cottage Instincts
DIY Day @ A Soft Place to Land
Get Your Craft On @ Today's Creative Blog
Thrifty Thursday @ Tales from Bloggeritaville
Transformation Thursdays @ The Shabby Chic Cottage
Strut Your Stuff Thursday @ Somewhat Simple
Before and After Party @ Thrifty Decor Chick
I Made it Without My Hubby @ Shanty 2 Chic
Saturday, February 20, 2010
The Awards Ceremony
Kristen tagged me a while back with these awards, and I am just now getting around to posting about them. Sorry Kristen! I've always loved receiving awards, and kept all my my silly little trophies from kiddie stuff as I was growing up. So I am beyond delighted to get my first blogging awards!
Thanks for thinking that I am creative, beautiful and fabulous, Kristen! I am so flattered. :-)
Friday, February 19, 2010
Friday Favs: Magic Jell-O
If you need a quick and easy standby recipe for a dessert, I've got it for you. I've yet to meet anyone who does not rave over this dessert. (Well, except for my picky brother in law, but he doesn't count.) :-) This recipe is simple, takes about 10 minutes to make, and is ready for company that evening.
What you will need:
Pour the Jell-O in a bowl. Mix with the boiling water until completely dissolved, about 1-2 minutes. Quickly add the cool whip in large chunks, stirring the mixture with a whisk until completely dissolved.
Place a few berries in the bottom of your cups. Pour Jell-O mixture over the berries, and refrigerate for 4 hours. Jell-o will magically layer while it is setting.
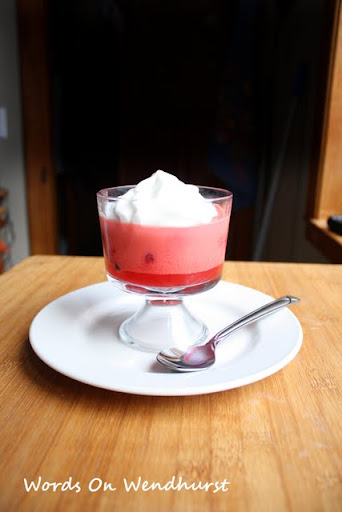
When set, top with more Cool Whip and eat up the yummy goodness!
Makes 4 1/2 cup servings. Enjoy!
Recipe created by Jell-O.
Linked to Finer Things Friday @ Amy's Finer Things
Foodie Friday @ Designs By Gollum
"Jell-O? I could be Jell-O."
"You're never gonna be Jell-O!"
"I have to be Jell-O! "
(name that movie)
Magic Mousse Jell-O
What you will need:
- Jell-O package (3 oz size) , any flavor (I think the berry flavors are best with this recipe)
- 1 1/2 cups boiling water
- 1 8oz tub of Cool Whip, frozen or thawed.
- Berries, any kind, frozen or fresh about 1 pint.
Pour the Jell-O in a bowl. Mix with the boiling water until completely dissolved, about 1-2 minutes. Quickly add the cool whip in large chunks, stirring the mixture with a whisk until completely dissolved.
Place a few berries in the bottom of your cups. Pour Jell-O mixture over the berries, and refrigerate for 4 hours. Jell-o will magically layer while it is setting.
When set, top with more Cool Whip and eat up the yummy goodness!
Makes 4 1/2 cup servings. Enjoy!
Recipe created by Jell-O.
Linked to Finer Things Friday @ Amy's Finer Things
Foodie Friday @ Designs By Gollum
Thursday, February 18, 2010
Babies in the Family!
September of 2009 brought two new adorable little babies into the family. My sister-in-law had handsome little Kayden at the beginning of the month, and my other sister in law had precious little Sofia at the end of the month. Needless to say, I was in my element taking pictures of our new nephew and niece!
I had to go all the way at California to get pictures of Kayden. These shots were actually taken when Kayden was about two weeks old, isn't he just precious?
And then, when I got home from California, I spent some time getting to know my new little niece. (She was actually born the night I got home from CA!) I love the name they chose for her, Sofia Irene. So sweet and pretty! Sofia wasn't in the mood for pictures the day I came out, but we still managed to get some cute ones.
Aren't they just precious? I love their sweet little faces and their tiny fingers and toes. I can't wait to see Kayden again, and my sister in law is expecting again in October... yay for more babies! :-)
Tuesday, February 16, 2010
Inspiration Tuesday: Basement Thoughts
This viewing room was designed by Windsor Smith. And because I have basement brain, it's inspiring me to think of colors for the basement. We're considering leaving the floor joists exposed, instead of drywalling the ceiling. They're not as high as the ones in this picture, but they are about seven feet up there, so there's plenty of clearance. We've even talked about installing lights similar to these to direct the light down out of the joists.
I'm not typically a fan of red and tan together, although I think this room pulls it off quite well. I know that I definitely want to do really warm tones in the basement though, because of the fact that it is a basement. And even though we're putting drywall over the cinder block and we'll be using lots of really thick, plush rugs, it's still a basement, so I want to make it as visually warm and cozy as I can.
I like the idea of using an old trunk or something else different for a coffee table/foot rest. The basement will be our hang out room, game room and TV room all in one, so we're going to want somewhere to put our feet up.
We've decided to find the perfect rug first, then pick out other stuff like couches, paint colors, etc. We've done the opposite in our living room, and we've discovered that 1)we're really picky about rugs, 2)our tastes vary greatly and 3)it's really hard to find a rug after the fact.
So that's where we are with the basement. We're doing funky colors in the laundry area, classic colors in the bathroom, and warm cozy colors in the great room. And somehow I will figure out how to tie it all together. :-)
Subscribe to:
Posts (Atom)