Showing posts with label basement remodeling. Show all posts

Thursday, March 13, 2014

The Basement 0verhaul Chapter 7

I bet you forgot about our basement renovation. :) Considering we had the work done two summers ago, and I still haven't shown you what it looks like today. If you want to read the old posts in this basement saga, be my guest. I'll wait while you refresh your memory. :)

Last we left off, the bathroom was drywalled and the electrical was run throughout the rest of the basement. Hang on to your shirts, because you're going to see a whole lot of progress in the following pictures. Ready?

In a nutshell, drywall went up and was spackled.


Stair risers were added, and new stair treads made the old, creaky, scary stairs so much better.


The stairwell walls were skimcoated to make the new drywalled spots seamless with the old plaster walls. Dust was everywhere.


Then the guys told me that I needed to plan a day out of the house so they could do all the sprayed priming. They were worried about all of the fumes affecting Javi. So we hightailed it out of there, and they spent hours spraying every last crook and cranny of the basement. We came home that evening to... (sing it with me) "a whole new world." :)


Now it's really looking like a room we can live in, right?


The ceiling is my favorite part of the whole basement. Because the house is nearly a hundred years old, it was built on enormously thick wooden beams. There was too much crazy going on in addition to the beams to just leave them as they were, so we opted to prime the entire ceiling. I love the way it all looks now.


Then they painted the floor with porch and floor paint. We were originally going to use a floor epoxy, but our contractor's paint guy said the off gassing is terrible, and that it's not cleared for indoor use. So we used "ultra durable" floor paint, which has proven to be very non-durable. It's great for the interim, but eventually we'll have to address that issue. But it instantly made things look all fancy pants!


The guys also finished the bathroom, but this post is getting too long. So we'll fast forward just a few months, thanks to the magic of the internet, and show you a quick preview of the wall color we chose down here. And... then it was on to the fun parts! Furniture! Rugs! Decorating!


xoxo,

Jenny

Monday, January 7, 2013

The Basement Overhaul Chapter 4

Monday morning (how fitting, since today is a Monday also!) the guys showed up bright and early and got to work with a vengeance. The framing was incredibly loud, but they were done with the entire basement by lunchtime. They also ran the wire for the electrical in the exterior walls, stapled plastic sheeting to all of the framing to form an extra moisture barrier, and then got started hanging the drywall. This is where they left off Monday night. And yes, it felt amazing to walk down the stairs and see the beginning of walls!


Thursday, January 3, 2013

The Basement Overhaul Chapter 3

In the next few posts, I am going to show you the day by day progress that the contractor and his team made in the basement. They worked for about three weeks, and accomplished an amazing amount in that time. Once we had signed the contract and the materials were delivered from Lowe's, Pat sent one of his guys over to drylok the cinderblock walls on a Friday, so that everything would be good and dry by the time they started work the next Monday.

We had already dryloked the south wall when we had that window replaced, since the broken window had let a lot of water in and really damaged the cinderblock there. So Wayne only had to do the bathroom, and the north and west walls. He banged it out in a couple of hours, which is impressive considering Drylok is a beast to work with. There were so many parts of this remodel that I am glad we hired out - for our sanity and our schedules!


Next up - framing and plastic sheeting!


Wednesday, February 24, 2010

Basement Overhaul: The Befores

As we are making good progress on the basement, and things are starting to resemble real rooms and areas again, I thought you might like to see what the basement looked like when we bought the house. Prepare yourself, as these pictures are sure to produce a strong reaction. Not an "aw!" reaction, more like a "yikes!" reaction. :-)

Are you ready? Ok, here we go. Here are the stairs that lead down to the basement. Fancy schmancy, eh? We kept those "BAR" letters, because they were just too darn tacky to throw away. Watch for them in the final reveal, we'll find a new home for them. :-)


Here's a picture looking up the stairs, so you can see where everything is in the basement.


Ok, when you reach the bottom of the stairs, on your left is the kitchen. Here's that enormous freezer I've talked about in the past.


Through the kitchen is the storage room, which came complete with green shag carpeting and three thousand two-prong extension cords (i.e. pretty useless cords)


Now, come back out of the storage room and go back to the stairs. On the left hand side is the "bar" area. Apparently they were going for a "watering hole" style of decor with the wooden corral bars and the overabundance of wood. And yes, those stools came with the house. I think they're in the attic right now. Isn't that shag on the walls and ceiling AWESOME!
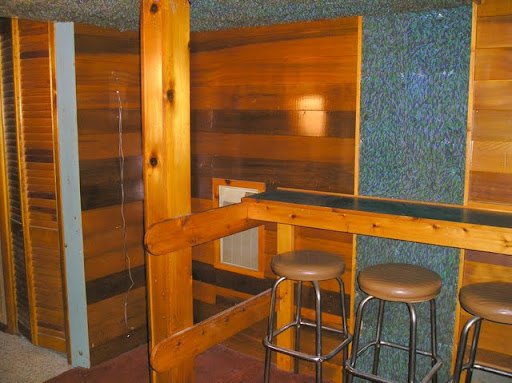


The wooden bar was covered with green contact paper. Don't ask why, as I really don't know. See that black slanted "roof" on top of the bar? When we first toured the house there was a collection of baseball caps up there. Thankfully, they were gone when we bought the house. You can just barely make out the orange and brown shag carpet ont the wall where the lamp is, and on the ceiling.


Here's a better picture of that whole corner, where you can see the bar, the keg fridge that came with the house, the random brick wall and the lovely lighthouse poster that was left for us.


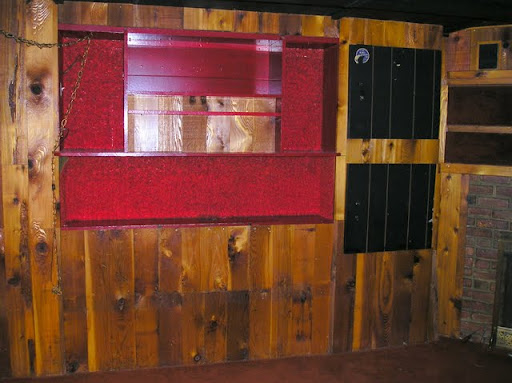
On the right of the brick wall (which is only about six feet long) was this builtin bookshelf extravaganza, covering the gas meter and the water main. The backs of the bookshelves are padded with red shag. The black panels "hide" the gas meter. They actually had really interesting handles on them, but the previous owners took them off before we bought the house. (!?!)


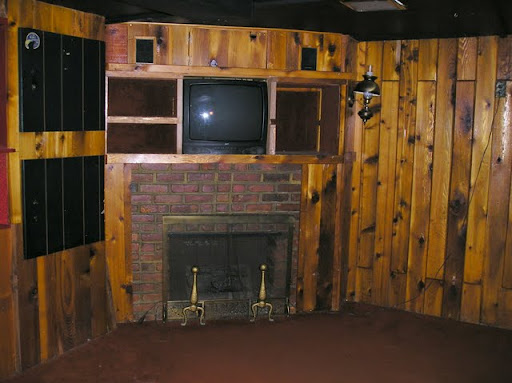
Just past the bookshelves is the TV corner. We're now on the right side of the basement. This whole entertainment center was built in to the wall, and that fireplace?? It's not real. They built an entire corner fireplace, with real brick and mortar, and then put an electric "fire" inside. Sigh. That thing was a bear to remove.


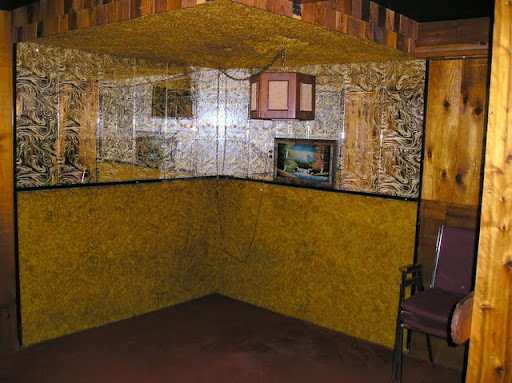
Moving on. In the opposite corner there was a lovely wall of mirrors. See that lovely pendant light? (gag!) Here's another one of the wall decorations we inherited, that covered up a missing mirror tile. I'm not sure why they covered it instead of replacing it, we found an entire box of leftover mirror tiles in the garage. Oh well.


Ok, all that's left to see is the bathroom. The toilet is straight on when you walk in, elevated on lovely brick red tiles. Why, I am not sure.
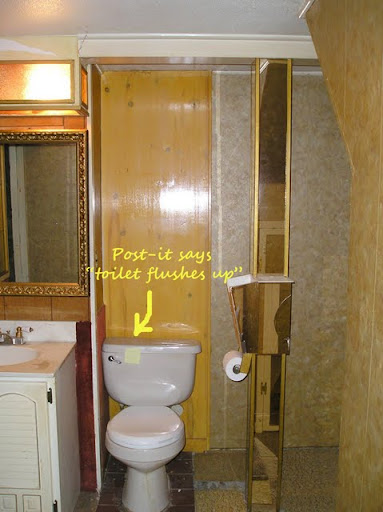


To the right is a built in closet, with mirrors, and a support post that has been mirrored as well. The mirrors help the space "feel bigger."  Don't you think?
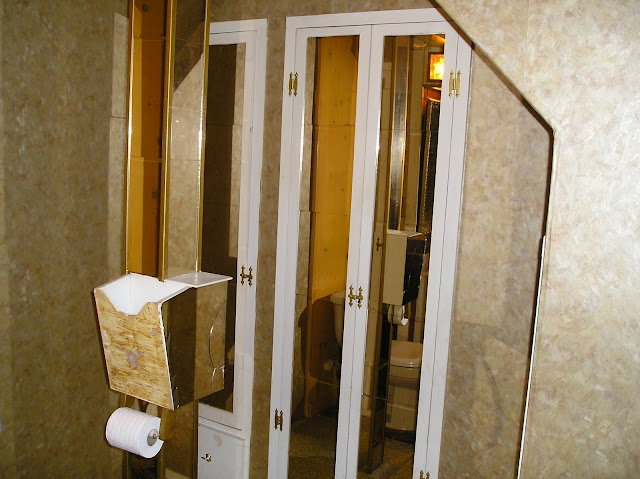


To the left is the vanity, with a gold mirror and another wall of mirrors. The gold mirror was covering up a huge hole in the wall that allowed "access" to the water shutoff valves for the basement.


And lastly, the laundry room. Go through the carpeted doors, (ew!)
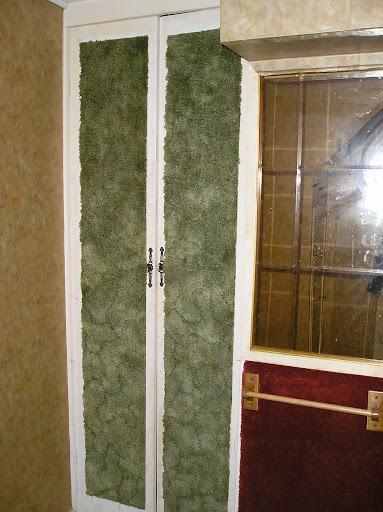


and you are greeted with this. Paneling in front of you,


fish wallpaper on the left


and this psychedelic cabinet on the right. Lovely, no?


We won't talk about how the wallpaper is covering what used to be a doorway, before they stuffed drywall in it and paneled the other side. We also won't talk about the backwards-in the corner laundry sink, or the fact that it is directly under the electrical panel. Because, really, isn't that the way YOU would set this room up?

So that's the basement's befores. Oh, and if you're wondering about where the covered up windows were, they were here,
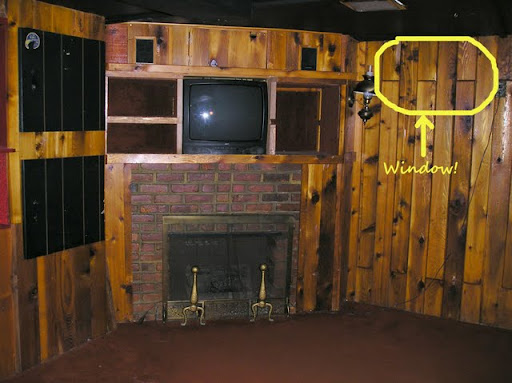


and here.
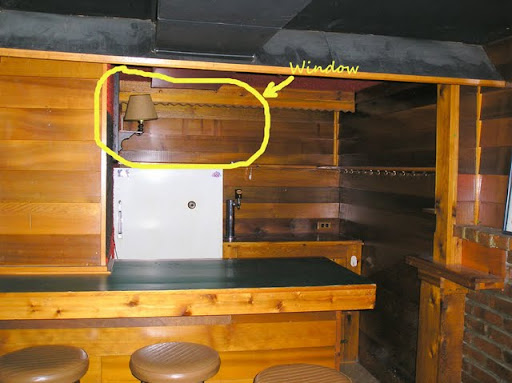


This one is the one we had replaced with the glass block window. The other one already was glass block, they had just paneled right  over it.

I do have this to say, in the previous owners' defense. If they hadn't created such a garish basement, our before and afters wouldn't be nearly as impressive. :-) I mean, anything is going to be better than this, right?

Sunday, January 31, 2010

Basement Remodeling: Part 1

The first completed project in our basement was actually completed by a professional! After two years of renovating our century old foursquare, and doing all of the work ourselves, it was nice to have a pro come in to take care of a job.

The previous owners had elected to cover up two of the four windows that let light into the basement. Of the two windows we uncovered, one was glass block already, score! The second, however, was just single pane glass, and broken, at that. Because of its large size (nearly 40 inches wide) we decided that it would be best to put in a glass block window, for security reasons. We also figured it would be nice to have the new window match the other three.

When the previous owners decided to cover up the window (instead of fix it), they chose to put paneling right over it on the inside, and a weird slat/frame over it on the outside. Apparently they weren't fans of natural light. :-(


Our work on this project consisted of removing the paneling from the inside, so the window was accessible, and then calling for quotes. We chose a small business owner who had years of experience and was also the best rate. Here's a tip when calling for quotes, be prepared to call as many contractors as you can, and be sure to mention that you are calling around for estimates. They are much more likely to work with you on price. In the end, the contractor we chose gave us a quote that was only $15 more expensive than the actual materials would have cost us at Lowe's. It was obviously a no brainer.

The window was installed and functional in two hours on a Wednesday morning. Not only did the contractor remove the old slats, glass and metal frame (and haul it away for us) but he did such a good job with the new window that it made our old ones look shoddy by comparison. At some point we'll have to have him out to replace the old glass block ones too!


We opted to include a vent in the window, as none of the others have one. We figure it will be nice to be able to air out the basement every once in a while.


So there you have it. A quick and easy renovation job where we didn't even have to lift a finger! (Well, except to write the check, of course. :-)

P.S. Don't forget to check back this week for some fun blog news!

Linked to Metamorphosis Monday @ Between Naps on the Porch

Make Your Monday @ Twice Remembered

Make It For Monday @ Cottage Instincts

Transformation Thursday @ Shabby Chic Cottage

Thrifty Thursday @ Tales from Bloggeritaville